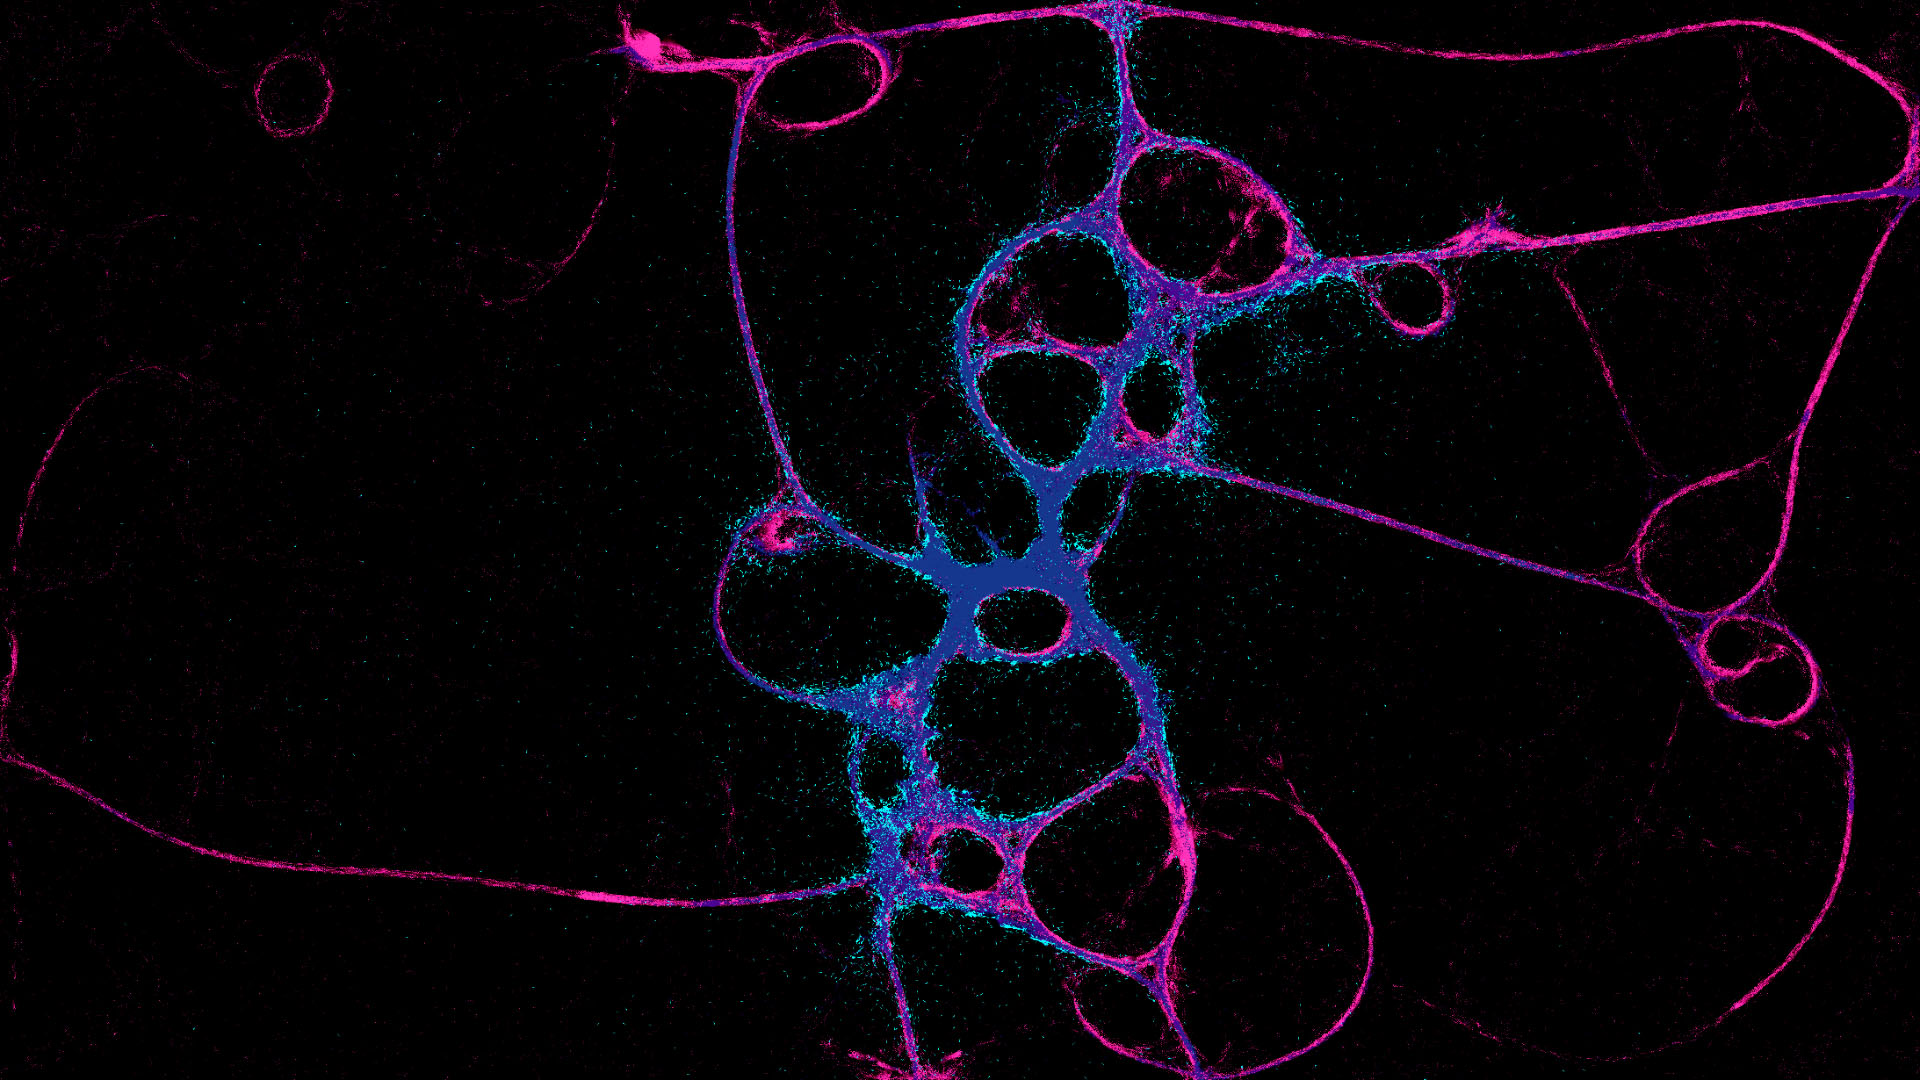
Interactive sandbox/visualizer of the real life organism Physarum polycephalum
1. Overview
Note: UI aesthetic design was not finalized in the trailer, see screenshots on Steam or media below for the final UI look.
This project evolved into a fully featured product while learning how to make compute shaders. I took the opportunity to release this small game publicly to also learn the process of marketing and shipping a game on Steam.
PHYSARUM: Slime Mold Simulator is an interactive sandbox visualizer of the real life organism Physarum polycephalum; all simulated on a single compute shader (simulation model of the slime mold is based on this paper). The GPU bound AI easily allows for millions of slime agents to be simulated in real time. Although not a traditional “game”, PHYSARUM is designed to encourage users to explore and experiment in a sandbox environment for entertainment value. This is inspired by old browser sandbox games such as Falling Sand. See trailer above for a full feature showcase.
2. Highlights
- Simulation and UI implementation done in the Unity game engine, with the built-in renderer
- Extensive C# and Cg/HLSL programming
- Experience dispatching GPU threads for compute shaders
- All shaders, game logic and UI implementations coded solo from scratch, without plug-ins or store assets (See 5. Implementation for examples)
- Simulation features include:
- Several game modes to create custom attractant maps to manipulate slime patterns
- "Morph" feature that allows any user made slime species to "mutate" (interpolate) into each other
- Share full simulations to others with PHYSARUM with the import/export feature
- Take a snapshot of the simulation anytime and export it as a PNG with transparency
- Undo/Redo functionality for all settings
- UI/UX design
- UI designed and implemented with base Unity UI components
- Some icons used from Kenney's game icons, others are custom made
- Full product launch on Steam
- Free Demo for users to test hardware requirements
- Steam store page set up with custom marketing assets
- Experience with the Steamworks SDK to create and deliver builds
- Positive Steam reviews (See 4. Reception for details)
- Zero budget marketing
- Customer support
- Personally responding to bug reports and questions about the product on Discord server, Steam Discussion forums, and live development streams
- Most user reported bugs fixed the day of report
- Collaborated with a composer to create the PHYSARUM soundtrack and trailer score
3. Game Features
Watch the slime mold Physarum polycephalum grow in real time as you tweak and mutate its properties. Learn about the real life organism and discover different ways to manipulate its behavior. Encounter countless unique and organic looking patterns with a seemingly simple multi-agent chemoattractant system.
Discovery is a core theme for this game, there are no intrusive tutorials (see 3.5 Learn for more details). The simulation starts immediately after the main menu; users are implicitly motivated by curiosity to discover the possibilities of the game. For example, the UI will appear when the cursor is placed in the left or right sections of the screen and clicking anywhere on the screen pushes or pulls (left and right click) the slimes. This intentional passive design along with a calming soundtrack invites users to explore at their leisure.
There is also a “Randomize” feature for instant dramatic results.
3.1 Fully Customizable Simulation
Users can take control of the simulation with a completely custom UI built in the Unity game engine. The game UI is compatible with any screen resolution/aspect ratio. Users can edit the simulation resolution/aspect ratio separately from the screen UI for a flexible simulation experience.
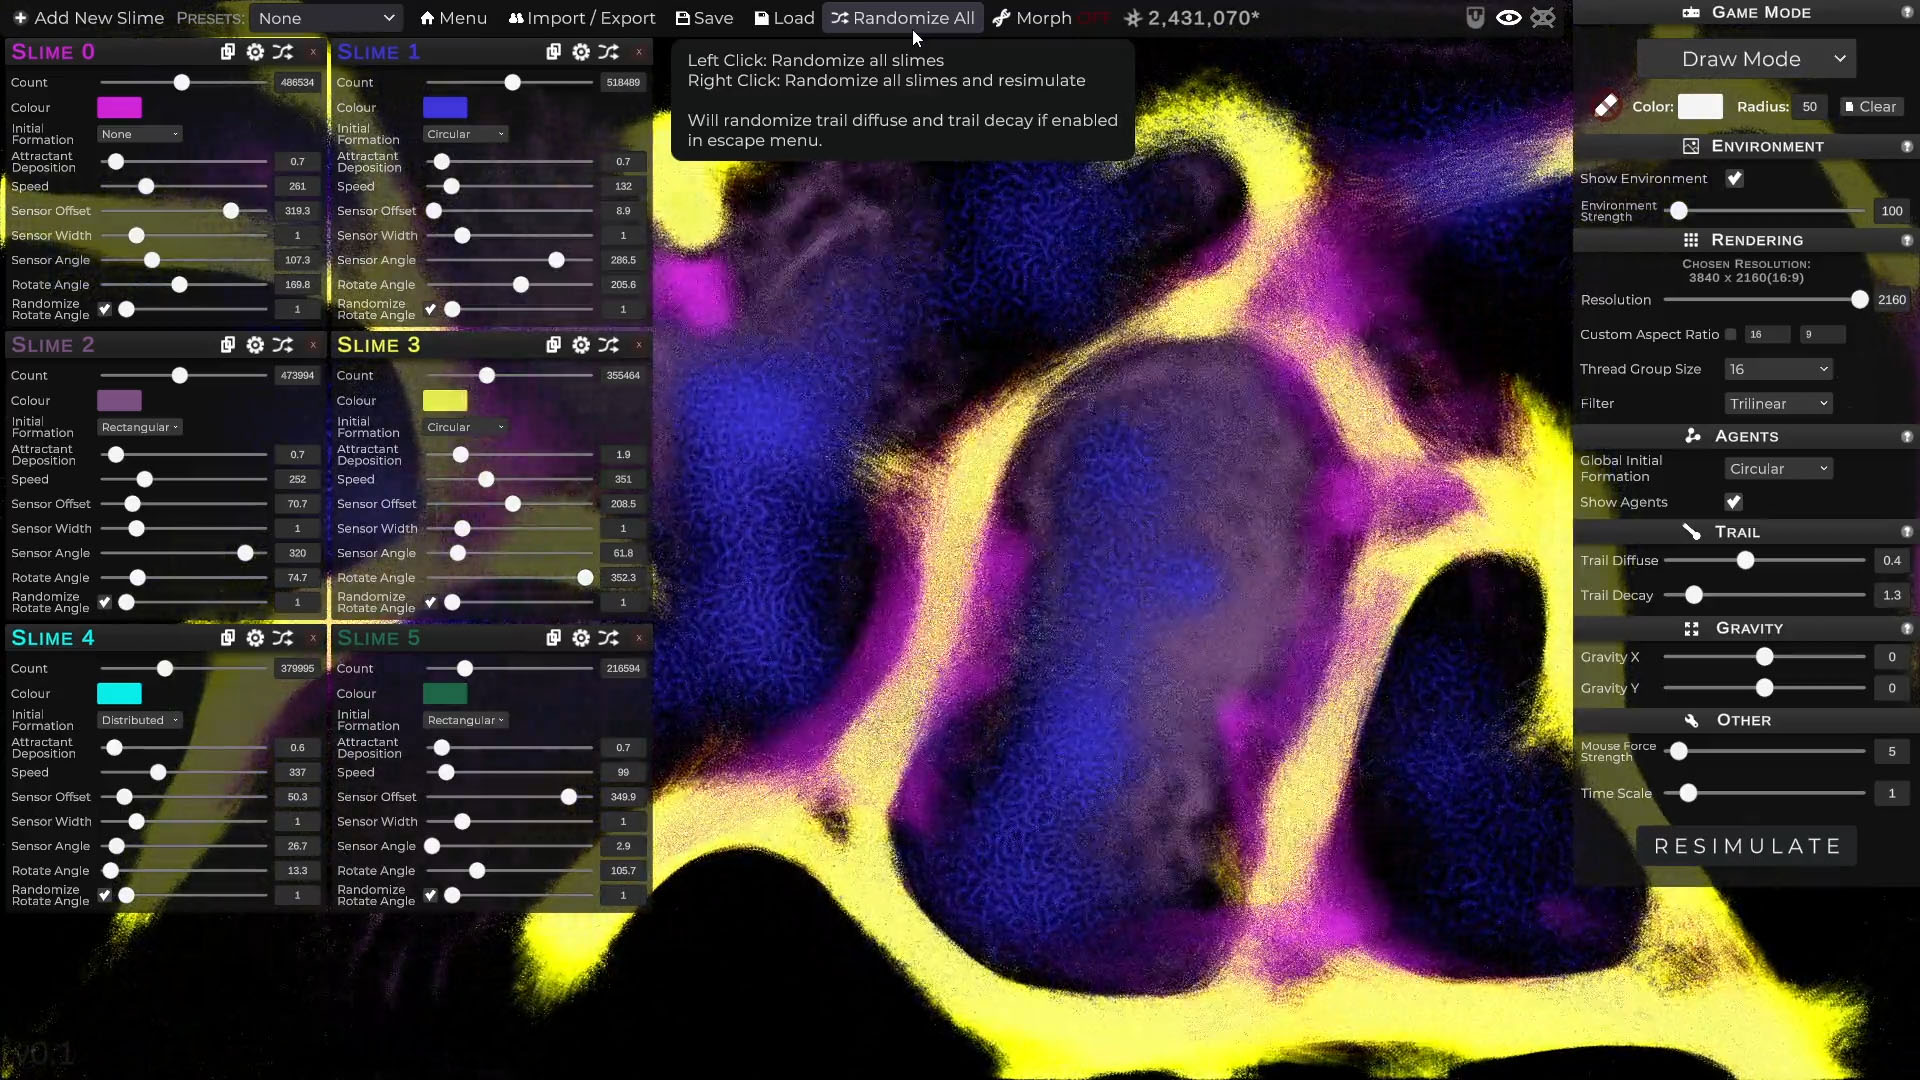
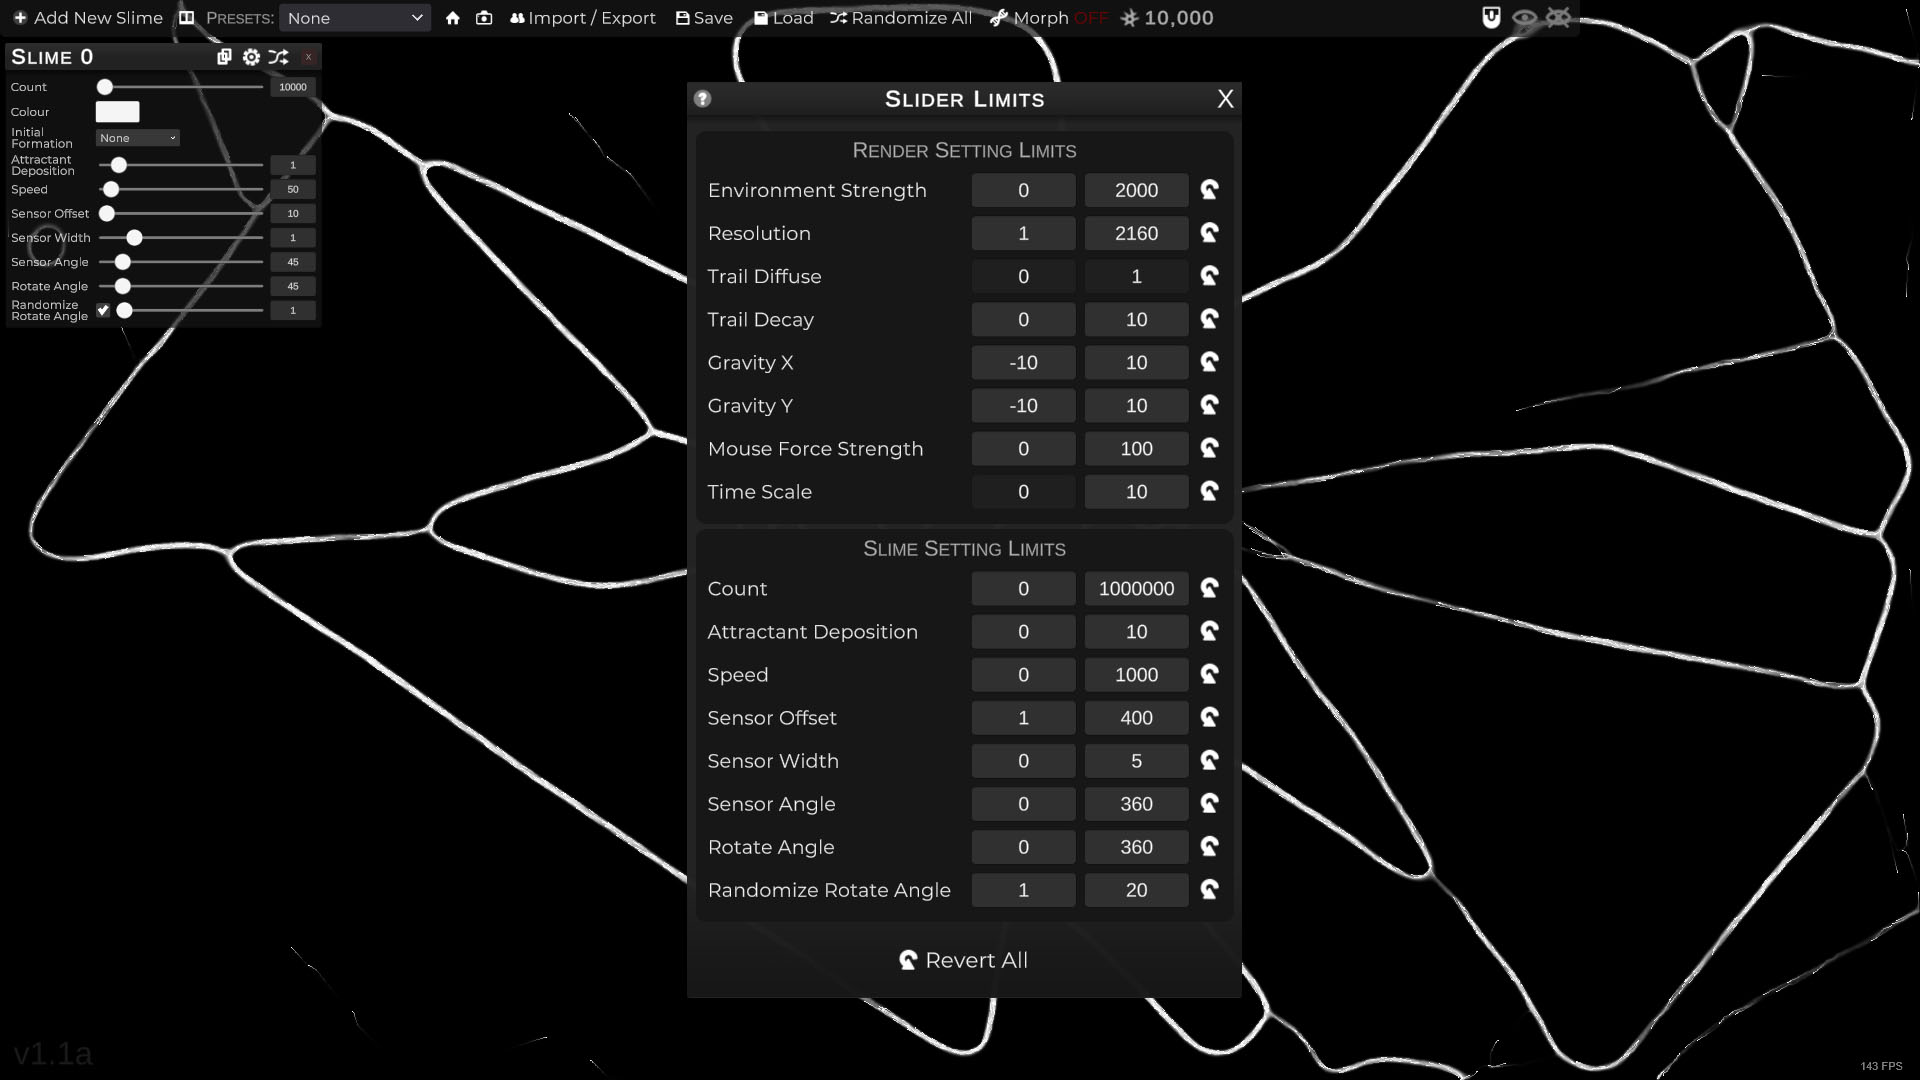
The UI is designed to be as simplistic as possible to condense all the simulation parameters in an easy to read manner. Although possibly daunting at first, every UI element provide tooltips to emergently teach the user the purpose of every button and slider without being overwhelming.
3.2 Game Modes
Media can be uploaded/created to direct the slime mold into any shape or pattern. The media acts as a permanent chemoattractant in the background layer (i.e. environment) of the simulation. This means slime particles will prefer colors that match the background, allowing for more user experimentation. The different environmental background options are separated into “game modes”:
Draw Mode
Draw environmental attractant using the mouse. Supports line drawing with arbitrary width and color and erasing.
Video/Image Mode
Upload image and/or video files to the game simply by copying them into a game folder. Images and videos can be rotated. Videos can be loaded into the simulation via URL if it is a direct path to a video file. There is also a basic playback UI with video scrubbing, pause/play, and muting.
Webcam Mode
Lastly, users can interact with the slime mold simulation with a live video feed via webcam.
3.3 Morph
The morph feature allows users to linearly interpolate between two user defined simulation states. This effectively make slime molds look like they are mutating and evolving into each other in real time.
3.4 Share
Simulation sessions can be serialized at anytime with an export feature. Every parameter in the simulation can be encoded into an easily sharable string. These strings can be imported into PHYSARUM: Slime Mold Simulator running on another computer to obtain an identical simulation (initial conditions only, individual particle positions are not encoded). A custom encoder was implemented to ensure that these sharable codes are both backward compatible with previous versions of the game and culture-insensitive.
Development Anecdote:
The custom encoder was not culture-insensitive on release, this caused import issues when codes were generated and imported in regions that use different decimal separators (i.e. 0.5 vs 0,5). This was promptly fixed after a user bug report was made. Lesson learned.
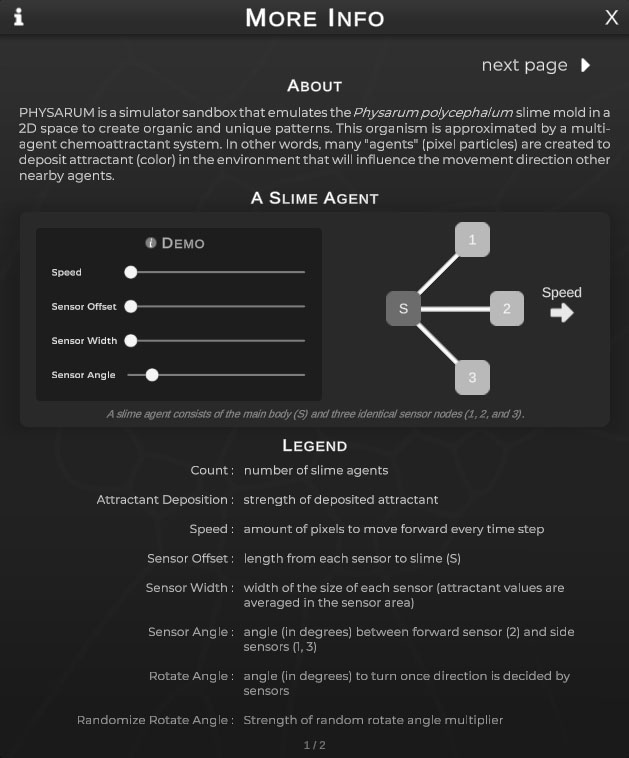
3.5 Learn
For users who are curious about the inner workings of the simulation or want to understand the slime particle parameters better, a detailed description is provided with an interactive slime particle visualizer.
4. Reception
PHYSARUM: Slime Mold Simulator has sold 450+ units, with 13 Steam reviews (84% positive) as of August 2023. Although a very niche and small game, reception has been very positive. Master’s students in AI, biology and engineering as well as fashion and graphic designers have reached out with questions about the software and permission to use it in their works (explicit permission is not needed).
5. Implementation
The slime agent algorithm was taken from this paper by Dr. Jeff Jones and the compute shader implementation is based on Sebastian Lague’s video and Catlike Coding’s tutorial.
Development Anecdote:
An early alpha of PHYSARUM: Slime Mold Simulator was sent to Sebastian Lague and Dr. Jones before release. Both were very gracious and enjoyed the game. Dr. Jones was responsible for suggesting a periodic boundary feature and a scalable UI.
5.1 Compute Shader
The entire simulation runs on a single compute shader that updates a texture for a quad that fits to the screen. The quad aspect ratio is calculated in runtime based on in-game settings and user screen resolution. A second identically scaled quad is rendered underneath to optionally show the “environment” (i.e. user images and videos). Note: comments are added into original code below for clarity.
Simulation Data is split into 4 buffers:
1
2
3
4
5
6
7
8
9
10
11
12
13
struct Agent {
	float2 position;
	float angle;
};

// Stores background color data (e.g. image, video, drawn pixels)
RWTexture2D<float4> _environmentMap;
// Stores slime attractant trails, used by slime sense algorithm and trail diffuse step (3x3 blur filter)
RWTexture2D<float4> _trailMap;
 // Final pixel map for main simulation quad
RWTexture2D<float4> _displayTex;
 // Stores individual slime agent data
RWStructuredBuffer<Agent> _agentBuffer;
The compute shader contains 4 main kernels:
1
2
3
4
5
6
7
8
9
10
11
12
13
14
15
// diffuses chemoattractant trails and writes result to _trailMap and _displayTex
#pragma kernel Fade

// for GPU accelerated filled circle drawing in "Draw Mode"
#pragma kernel DrawCircleAtMousePos

// main slime agent behavior algorithm, reads and writes to _trailMap
#pragma kernel SlimeAgentCalc16
#pragma kernel SlimeAgentCalc32
#pragma kernel SlimeAgentCalc64

// reads _agentBuffer to color all pixel locations with slime agents in _displayTex (overrides Fade kernel result)
#pragma kernel DrawAgents16
#pragma kernel DrawAgents32
#pragma kernel DrawAgents64
Note: 16, 32, and 64 suffixes refer to thread group versions (e.g. SlimeAgentCalc32 has attribute [numthreads(32, 1, 1)])
Buffers and kernels are separated more than needed to encourage modularity in the implementation, and to allow the user to turn different color maps on and off during runtime. The simulation also features customizable thread group sizes (CPU dispatcher will adjust thread group parameters accordingly). Through light research, single dimension 32 and 64 thread groups seem to be recommended for most hardware, but I found that group size 8 worked best for my system at the time, so it is included as well. I also found that 2 dimensional thread groups did not help with performance through brief testing, so it is not an option in the simulation.
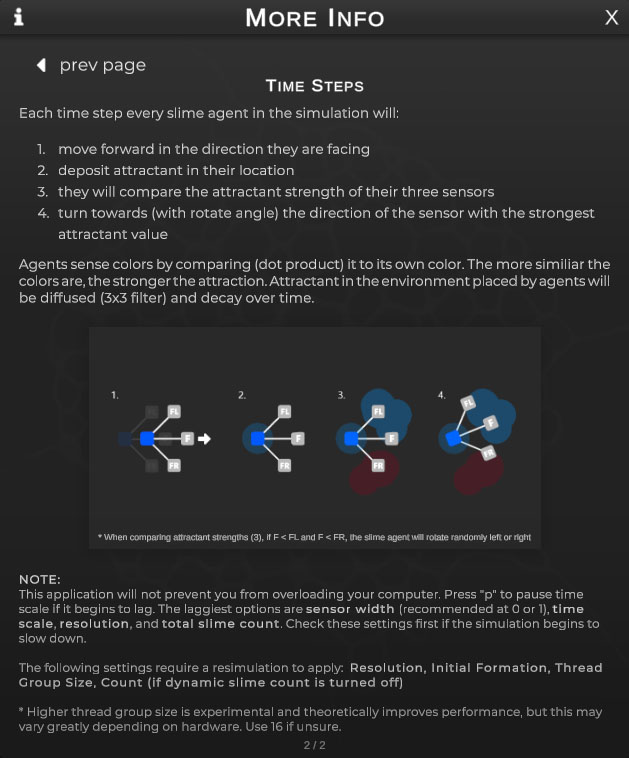
Main slime agent movement behavior algorithm:
1
2
3
4
5
6
7
8
9
10
11
12
13
14
15
16
17
18
19
20
21
22
23
24
25
26
27
28
29
30
31
32
33
34
35
36
37
38
39
40
41
42
43
44
45
46
47
48
49
50
51
52
53
54
55
56
57
58
59
60
61
62
63
64
65
66
67
68
69
70
71
72
73
74
75
76
77
78
79
80
81
82
83
84
85
86
87
88
void SlimeAgentCalcBase(uint id) {
	if (id > (uint)_instanceAgentCount - 1) {
		return;
	}

	int slimeIndex = id + _indexOffset;

	// agent before movement update
	Agent agent = _agentBuffer[slimeIndex];

	float seededRandomValue = hash(17 + 31 * hash(agent.position.y + 53 * hash(agent.position.x + _time * 100000)) + 97 * hash(id + _time * 100000)) / 4294967295.0;

	// MOVEMENT STEP
	float sensoryStepSize = _slimeSpeed * _deltaTime;
	float2 newPos = agent.position + sensoryStepSize * float2(cos(agent.angle), sin(agent.angle));

	// Gravity
	newPos += float2(_gravityX, _gravityY);

	// Mouse attractant
	float2 mousePos = float2(_mousePosX, _mousePosY);
	float mousPosDistance = distance(newPos, float2(_mousePosX, _mousePosY));
	newPos += _mouseAttractantToggle * normalize(mousePos - newPos) * clamp(_mouseAttractantStrength / (mousPosDistance * mousPosDistance), -5, 5);

	// No periodic boundary, pick random direction and don't move if out of boundary
	if (_periodicBoundaryToggle == 0) {
		// if movement not succesful
		if (newPos.x <= 0 || newPos.x >= _resX || newPos.y <= 0 || newPos.y >= _resY) {
			// pick new random angle
			_agentBuffer[slimeIndex].angle = seededRandomValue * 2.0 * PI;

			// Don't move this agent
			return;
		}
	}
	// Periodic Boundary
	else {
		if (newPos.x <= 0) {
			newPos.x = _resX - 1;
		}
		else if (newPos.x >= _resX) {
			newPos.x = 1;
		}

		if (newPos.y <= 0) {
			newPos.y = _resY - 1;
		}
		else if (newPos.y >= _resY) {
			newPos.y = 1;
		}
	}

	// Move
	_agentBuffer[slimeIndex].position = newPos;

	// Chemoattractant deposition
	_trailMap[newPos] = _slimeColor * _slimeAttractantDeposition;

	// SENSORY STEP (change angle)
	float F = sense(_agentBuffer[slimeIndex], 0);
	float FL = sense(_agentBuffer[slimeIndex], -_slimeSensorAngle);
	float FR = sense(_agentBuffer[slimeIndex], _slimeSensorAngle);

	// angle randomization
	float randomizedValue = _slimeRotateRandomStrength * seededRandomValue;
	float randomAngleStrength = (1 - _slimeRotateRandomToggle) + _slimeRotateRandomToggle * randomizedValue;
	float randomizedAngle = _slimeRotateAngle * randomAngleStrength;

	// stay in same direction
	if (F > FL && F > FR) {
		return;
	}
	// Rotate Randomly left or right
	else if (F < FL && F < FR) {
		if (seededRandomValue < 0.5) {
			_agentBuffer[slimeIndex].angle += randomizedAngle;
		}
		else {
			_agentBuffer[slimeIndex].angle -= randomizedAngle;
		}
	}
	else if (FL < FR) {
		_agentBuffer[slimeIndex].angle += randomizedAngle;
	}
	else if (FR < FL) {
		_agentBuffer[slimeIndex].angle -= randomizedAngle;
	}
}
Note: Algorithm is implemented mostly verbatim from Dr. Jeff Jones’ paper, with additional features from my simulation (e.g. gravity, mouse forces, periodic boundary). Extensive branching is generally not recommended for a shader, but I left the branches to keep things readable. Theoretically, most of it should be optimized away by the compiler, but I did not test it and the performance is good enough.
I opted for multiplicative color mixing in line 57 out of preference because I did not like the colors often mixing to white. However, I found that many implementations on the internet use additive color mixing, which achieves color effects my simulation is not capable of. I wanted to include a feature to pick the color mixing method, but ran out of time.
Development Anecdote:
Some effort was needed to make a “good enough” hash. In other words, one that will produce minimal noticeable patterning artifacts for large resolutions and slime agent counts. The hash(...) function used is just a random one found online. I added the mess in line 11 above to produce a random enough hash through experimentation. Without much experience making good hashes, I’m sure a much better implementation exists for this algorithm.
"sense(...)" function from above:
1
2
3
4
5
6
7
8
9
10
11
12
13
14
15
16
17
18
19
20
21
22
23
24
float sense(Agent agent, float sensorAngleOffset) {
	int sensorWidth = _slimeSensorWidth;

	float sensorAngle = agent.angle + sensorAngleOffset;
	float2 sensorPos = agent.position + _slimeSensorOffset * float2(cos(sensorAngle), sin(sensorAngle));

	int sensorCentreX = (int)sensorPos.x;
	int sensorCentreY = (int)sensorPos.y;

	float sum = 0;
	for (int offsetX = -sensorWidth; offsetX <= sensorWidth; offsetX++) {
		for (int offsetY = -sensorWidth; offsetY <= sensorWidth; offsetY++) {
			int sampleX = min(_resX - 1, max(0, sensorCentreX + offsetX));
			int sampleY = min(_resY - 1, max(0, sensorCentreY + offsetY));
            // simple dot product comparison of color to differentiate slimes
			sum += dot(_slimeColor, _trailMap[int2(sampleX, sampleY)]);
		}
	}

	// Environment sensing
	sum += dot(_slimeColor, _environmentMap[int2(min(_resX - 1, max(0, sensorCentreX)), min(_resY - 1, max(0, sensorCentreY)))]) * _environmentStrength;

	return sum;
}
Note: this is a refactored version of Sebastian Lague’s algorithm, with my addition in line 21 to include “environmental” influences such as user uploaded images and videos
Draw Mode Algorithm
The DrawCircleAtMousePos kernel is just a clever algorithm I found online. I initially attempted to write to the texture on the CPU side, but I quickly realized that it was way too slow without GPU acceleration.
CPU Dispatcher
CPU side code is largely uninteresting and longwinded. Below is an excerpt of code updating textures after all the user settings are loaded and slime positions/trails are calculated (happens every frame in Update()).
1
2
3
4
5
6
7
8
9
10
11
12
13
14
15
16
17
18
19
20
21
22
23
24
25
26
27
28
29
30
31
32
33
private void LateUpdate() {
    if (slimeTotalAgentCount <= 0 || isDisabled) {
        return;
    }

    // draw agents
    if (isDrawAgents) {
        uint currentIndexOffset = 0;
        foreach (SlimeSettings slimeSettings in SlimeManager.slimes) {
            uint individualSlimeCount = isDynamicSlimeCountLoading ? slimeSettings.count : slimeSettings.currentCount;
            if(individualSlimeCount == 0) {
                continue;
            }

            computeShader.SetInt(instanceAgentCountID, (int)individualSlimeCount);
            computeShader.SetInt(indexOffsetID, (int)currentIndexOffset);
            computeShader.SetVector(slimeColorID, new Vector4(slimeSettings.r, slimeSettings.g, slimeSettings.b, 1));

            computeShader.Dispatch(drawAgentKernel, Mathf.CeilToInt(individualSlimeCount / threadGroupSize), 1, 1);

            currentIndexOffset += isDynamicSlimeCountLoading ? maxIndividualSlimeCount : slimeSettings.currentCount;
        }
    }

    // Update environment textures
    if (currentPlayMode == PlayMode.DRAW || currentPlayMode == PlayMode.IMAGE) return;
    if(currentPlayMode == PlayMode.WEBCAM && webCamTex != null) {
        Graphics.Blit(webCamTex, environmentMap);
    }
    else if(currentPlayMode == PlayMode.VIDEO) {
        Graphics.Blit(backgroundEnvironment, environmentMap);
    }
}
Note: Lines 10 — 13 allows for slimes to appear and disappear in real time as the user changes slime count, this normally requires the “Resimulation” button to be pressed. This feature can be toggled on and off in-game.
5.2 Tooltip Framework
Text tooltips can be challenging because they must stay within a screen of any resolution/aspect ratio, while having an arbitrary width and height to fit text content. Additionally, we must account for scale of the UI element we are creating the tooltip from, this is because the game features a scalable UI.
I used a solution I developed in Last Secutor: use a reference UI resolution of 1920 x 1080 and fit arbitrary resolutions by height. The Unity canvas scaler component does this by altering the scale of all UI objects. Which is why the “lossy scale” (i.e. the global scale: this includes the canvas scaler multiplier AND the scale multiplier from my scalable UI feature) is used to get a coefficient representing the aspect ratio difference between the run time screen and the reference resolution. Using this method with the appropriate position anchors also allows the UI as a whole to work predictably with any screen size and aspect ratio.
Function used to position text tooltips of arbitrary size within any screen size:
1
2
3
4
5
6
7
8
9
10
11
12
13
14
15
16
17
18
19
20
21
22
23
24
25
26
27
28
29
30
31
32
33
34
35
36
37
38
39
40
41
42
43
44
45
46
47
48
49
50
51
52
53
54
55
private IEnumerator CalculateTooltipPosition(RectTransform targetObjectRect, Vector2 customOffset) {
    LayoutRebuilder.ForceRebuildLayoutImmediate(tooltipRectTransform);
    yield return new WaitForEndOfFrame();

    float tooltipWidth = tooltipRectTransform.rect.size.x;
    float tooltipHeight = tooltipRectTransform.rect.size.y;

    float targetObjectWidth = targetObjectRect.rect.width * targetObjectRect.lossyScale.x;
    float targetObjectHeight = targetObjectRect.rect.height * targetObjectRect.lossyScale.y;

    // Scale positions and screen measurements with canvas scaler ratio
    // Note: make sure we use tooltip parent for UI scaling
    float aspectRatioScaling = 1 / tooltipRectTransform.parent.lossyScale.y;

    float scaledScreenHeight = Screen.height * aspectRatioScaling;
    float scaledScreenWidth = Screen.width * aspectRatioScaling;

    Vector3 scaledTargetObjectPosition = targetObjectRect.position * aspectRatioScaling;

    // above target object with padding
    float verticalAdjustOffset = (targetObjectHeight / 2f) + (tooltipHeight / 2f) + pixelPadding;
    // to the right of target object with padding
    float horizontalAdjustOffset = (tooltipWidth / 2f) + pixelPadding;

    // top edge of tooltip when it is above hovered object with padding
    float topTooltipY = scaledTargetObjectPosition.y + verticalAdjustOffset + tooltipHeight / 2f;

    // left and right edge of tooltip where middle of tooltip is centred on hoveredObject
    float leftTooltipX = scaledTargetObjectPosition.x - horizontalAdjustOffset;
    float rightTooltipX = scaledTargetObjectPosition.x + horizontalAdjustOffset;

    if (topTooltipY > scaledScreenHeight) {
        // flip tooltip to bottom
        verticalAdjustOffset = -verticalAdjustOffset;
    }

    if(leftTooltipX < 0f) {
        // if left side of tooltip goes past left side of screen,
        // nudge it to the right with padding
        horizontalAdjustOffset = -leftTooltipX + pixelPadding;
    }
    else if(rightTooltipX > scaledScreenWidth) {
        // flip tooltip to left side
        horizontalAdjustOffset = -horizontalAdjustOffset;
    }
    // no horizontal adjust needed
    else {
        horizontalAdjustOffset = 0f;
    }

    // Final tooltip position
    tooltipRectTransform.anchoredPosition = scaledTargetObjectPosition + new Vector3(horizontalAdjustOffset + customOffset.x, verticalAdjustOffset + customOffset.y);

    tooltipCanvasGroup.alpha = 1f;
}
Note: Line 13 calculates the scaling factor between runtime screen dimensions and reference resolution (1920 x 1080).
Non-Text Tooltips
Menus like the color picker and “randomize settings” menu have a similar placement requirement of fitting within any screen size. However, I used simpler ad hoc solutions by taking advantage of invariant properties of the UI design.
For example, it is guaranteed in the UI design that the color picker menu will always show on the right side of the color picker buttons. By default, color picker menus are always placed with the same horizontal offset from the button, with the top of the button flush with the top of the menu. Therefore, we only need to check if the bottom of the color picker goes lower than the bottom of the screen and adjust accordingly since color picker buttons are never above the screen.
5.3 Color Picker
Many UI elements are custom solutions built from scratch in Unity. One of the more complex elements is the color picker. My interface uses HSL color representation for intuitive color picking. Saturation and lightness is represented by the horizontal and vertical (respectively) 2D texture coordinates in the main color picking square; hue can be chosen in a vertical gradient on the side. RGB sliders with input boxes can also be used as an alternative. When one color representation value (i.e. HSL or RGB) is changed, the other color representation values and UI elements are updated in real time.
The hue gradient and saturation/lightness square are rendered via uv coordinate interpolation and mouse coordinates are normalized, this means the color picker will work with any width and height without changing any code.
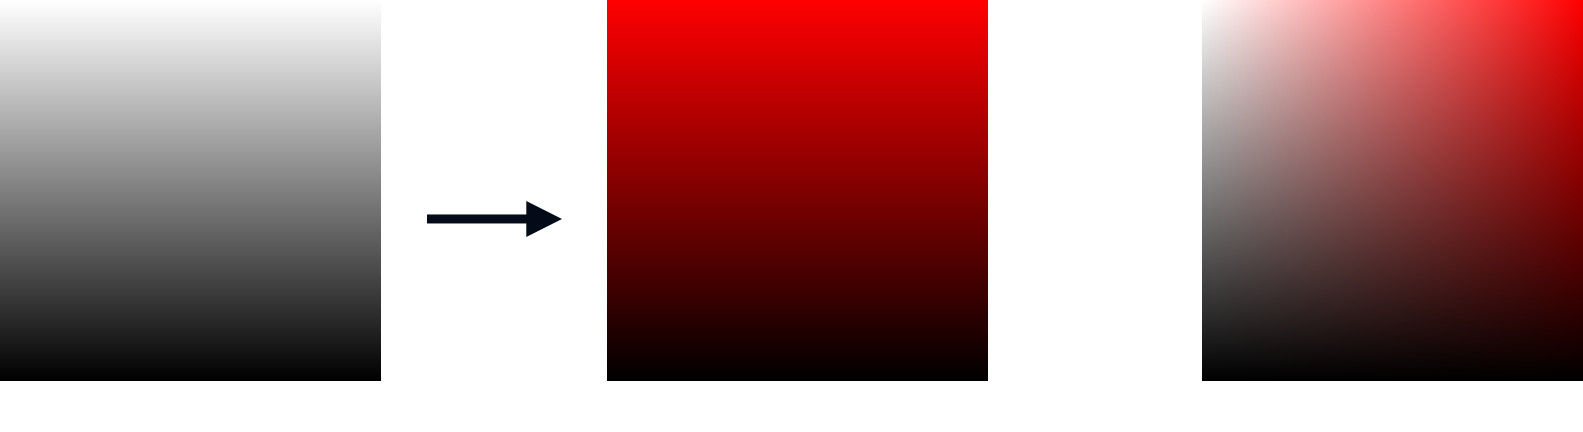
Saturation/Lightness Square Fragment Shader:
To render the color picker square, we use the uv values on the UI texture to calculate color values. This is done by linearly interpolating between the vertical uv value (Figure 1) and the vertical uv multiplied with the selected hue color (Figure 2, with red as selected hue), using the horizontal uv value. This results in a dynamic texture that is equivalent to showing all the saturation and lightness values, that can be colored with any hue (Figure 3).
1
2
3
4
5
6
7
8
9
fixed4 frag (v2f i) : SV_Target {
    fixed4 col = lerp(
        fixed4(i.uv.y, i.uv.y, i.uv.y, 1),
        fixed4(i.uv.y * i.color.x, i.uv.y * i.color.y, i.uv.y * i.color.z, 1),
        i.uv.x
    );
    col.a = i.color.a;
    return col;
}
Note: i.color is the hue of the square, which is updated externally
Hue Gradient Fragment Shader:
For the vertical hue selector, the vertical uv coordinates [0, 1] are scaled to hue values [0, 360]. The final HSL color is calculated using a formula found on wikipedia, with locked S and L values.
1
2
3
4
5
6
7
8
9
10
11
12
13
14
15
16
17
18
19
20
21
22
float HSL2RGB(float n, float H, float a, float L) {
    float k = fmod(n + (H / 30), 12);
    return L - a * max(-1, min(k - 3, min(9 - k, 1)));
}

fixed4 frag (v2f i) : SV_Target
{
    float H = i.uv.y * 360;
    float S = 1;
    float L = 0.5;

    float a = S * min(L, 1 - L);

    fixed4 col = fixed4(
        HSL2RGB(0, H, a, L),
        HSL2RGB(8, H, a, L),
        HSL2RGB(4, H, a, L),
        i.color.a
    );

    return col;
}